
INTRODUCTION
This article explains the Angular2 reactive forms or model based development. At the end of this article, there is also an explanation video to demonstrate the concept. The source code can be downloaded at this LINK.
There are two common approaches in Angular2 for Form development:
- Template based forms
- Model based forms or reactive forms
We can use anyone of them based on our decision. Template based form approach is generally used for small pages where we don’t need a lot of logic in our html page. Reactive forms or model based approach is being used for larger pages. Reactive forms has several advantages over template based form approach. In reactive forms you declare all of your fields and validation on component and then wireup them to HTML template. You can dynamically create form as per your programming logic and perform testing over validation in reactive forms.
In this article we will build a user profile as shown below.

The HTML VIEW
This is how our HTML looks like.
<div>
    <h1>Edit your profile</h1>
    <hr>
    <div class="col-md-4">
        <form autocomplete="off" [formGroup]="profileForm" (ngSubmit)="saveForm(profileForm.value)" novalidate>
            <div class='form-group'>
                <label for="firstName">First Name:</label>
                <input type="text" formControlName="firstName" id='firstName' class="form-control" placeholder="First Name ....">
            </div>
            <div class='form-group'>
                <label for="lastName">Last Name:</label>
                <input type="text" formControlName="lastName" id='lastName' class="form-control" placeholder="Last Name ....">
            </div>

            <div class='form-group'>
                <label for="address">Address:</label>
                <input type="text" formControlName="address"  id='address' class="form-control" placeholder="Address ....">
            </div>
            <div class='form-group'>
                <label for="city">City:</label>
                <input type="text" id='city' formControlName="city" class="form-control" placeholder="City....">
            </div>
            <div class='form-group'>
                <label for="country">Country:</label>
                <input type="text" id='country' formControlName="country" class="form-control" placeholder="Country ....">
            </div>

            <div class="form-group">
                <button type="submit" class="btn btn-primary">Save</button>
                <button type="button" class="btn btn-default">Cancel</button>
            </div>
        </form>
    </div>
</div>
IMPLEMENTATION
All set! Let’s implement our model-driven form.
Initialize the Form Model
Here is the initialization of my userprofile component from code.
import {Component, OnInit} from '@angular/core';
import {FormControl, FormGroup} from '@angular/forms'
import {AuthService} from './auth.service'
@Component({
    selector: 'db-userprofile',
    templateUrl: 'app/user/userprofile.component.html'

})
export class UserProfile implements OnInit {
    firstName: FormControl
    lastName: FormControl
    address: FormControl
    city: FormControl
    country: FormControl

    profileForm: FormGroup

    constructor(private authService: AuthService) {

    }
    ngOnInit() {
        this.firstName = new FormControl(this.authService.CurrentUser.firstName);
        this.lastName = new FormControl(this.authService.CurrentUser.lastName);
        this.address = new FormControl(this.authService.CurrentUser.address);
        this.city = new FormControl(this.authService.CurrentUser.city);
        this.country = new FormControl(this.authService.CurrentUser.country);


        this.profileForm = new FormGroup({
            firstName: this.firstName,
            lastName: this.lastName,
            address: this.address,
            city: this.city,
            country: this.country

        })
    }
    saveForm(formValues: any) {
        console.log(formValues)
        return false
    }
}
FormGroup and FormControl
We have declared firstname, a lastname and some address information. Now, to make this form model-driven, what we need to do is to create a form model that represents that DOM structure in our component. One way to do that is to use the low level APIs for FormGroup and FormControl.
FormGroup always represents a set of FormControls. In fact, a form is always a FormGroup. The following code sample corresponds form model for our template:
First step is to add this import directive.

As per our HTML Template requirements we have to add all fields in our userprofile component and the types of the fields should be FormControl. We also need a FormGroup field to add all these FormControls into our form as shown below.

Finally we have to add all these FormControls in our FormGroup.

Mapping Component Fields to our HTML Template
FormGroup field should be mapped with Form attribute as you can see below in our HTML code.

FormControl fields should be mapped with our Input Controls as shown below.
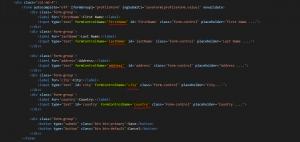
Note: FormControlName field value as underlined red in above code sample should be matched with the properties of profileForm GroupForm type field in userprofile.component.
ReactiveFormsModule
The last step is to add ReactiveFormsModule in our app.module.ts file which is neccessary for Reactive Forms as shown belows.

SaveProfile Function
Finally we have to get all the changed values from our form to the component. We have created a saveForm function in our component and passed all our Form fields values to our Function as you can see below.

Passing form values to SaveForm function from HTML Form tag component can be seen below.

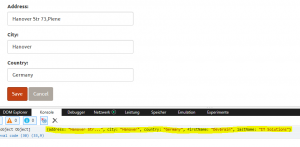
Final Output
I am displaying all the changed fields in Console. But you can send this form information to your service for updating the data in the backend side.
SUMMARY
In this article we have learned the Angular2 reactive forms or model based binding technique. We have imported the angular forms module and used FormControl and FormGroup typed for binding fields with their controls in HTML Form. Working with Reactive forms we have to import ReactiveFormsModule into the app.module.ts component.
EXPLANATION VIDEO
